
How to Import Your Manuscript into Inkfluence AI (and Get the Chapters Right First Time)
If you have already written a book in Word, Google Docs or another writing tool, you do not have to start again. In the video above James uploads a finished manuscript, checks the chapter list, looks at turning it into a different kind of book, then imports it as it is, adds a cover, edits it with AI and shows where it can be published or exported, all in under three minutes. This page follows the same steps and adds what the video has no time for: how to set up your file so every chapter lands where it should, what each screen shows, what to do when the chapters split wrong, and how to get from your manuscript to Amazon KDP.
How do you import a manuscript into Inkfluence AI?
Give each chapter title the Heading 1 style in Word or Google Docs and save it as a .docx file. In Inkfluence AI, click New Book, then Import a document (or the Import content tile on the dashboard), and drop the file in. Check the chapter list it shows you, with the words and pages in each chapter, then click Import to open the book in the editor exactly as you wrote it, or Import and Remix to turn it into a new book in another format. From the editor you can proofread, change the cover, publish to the free showcase, Gumroad or Etsy, or export a PDF, EPUB, DOCX or KDP package. PDF, EPUB, Markdown and plain text files work too; the short import help articles cover each one.
What the video covers, in order
- Two ways in: New Book, then Import a document, or the Import content tile further down the dashboard. Both open the same window
- Drop your files here: the manuscript uploads and is read
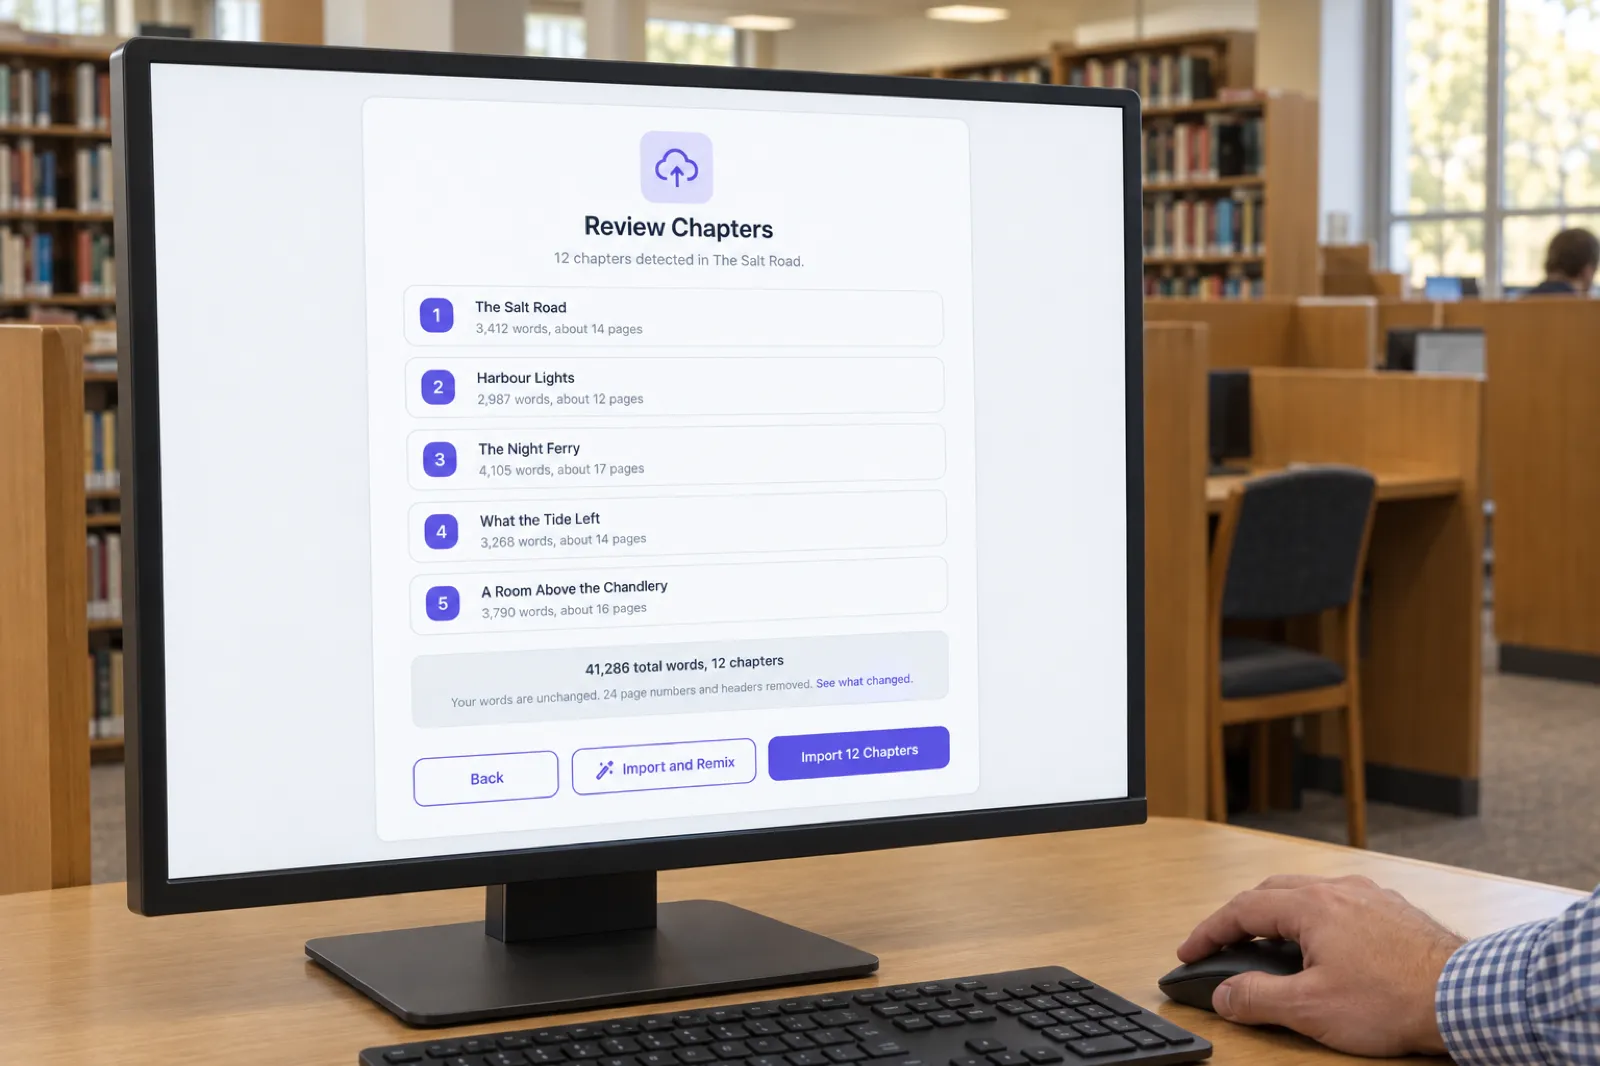
- The chapter list: every chapter name with its word and page count, and the total words and chapters at the bottom
- Import and Remix: pick a new format (how-to guide, children’s story, study guide, day challenge and more), then Preview outline
- The outline for the new book, with a summary for every chapter, ready to generate
- Back to the original: importing the chapters as they are, and the genre detected (fiction here)
- The cover: a stock image or an AI cover
- Editing the text by hand, or with AI to proofread or rewrite
- Publish to the free showcase, Gumroad or Etsy, or export as a PDF and the other formats to read or upload to Amazon
Before you upload: make the chapters easy to find
The import has one hard job: working out where each chapter starts. Get that right and everything after it (the chapter list in the editor, the table of contents in the PDF and EPUB, the chapter breaks in a paperback) falls into place. Get it wrong and you spend the next hour merging and splitting chapters by hand. Five minutes in your writing tool beforehand saves that hour.
Word: use Heading 1 for chapters
Word files carry styles, and the import reads them. Every paragraph styled Heading 1 starts a new chapter, and its text becomes the chapter title. Heading 2 and Heading 3 stay inside the chapter as section headings. This is the most reliable way to import a book, because the split follows exactly what you marked.
- Click into each chapter title and choose Heading 1 from the Styles gallery on the Home tab. Making a title big and bold by hand does not count: it has to be the style.
- Give section titles Heading 2. They stay inside their chapter and show as headings in the editor and the export.
- Leave the book title in the Title style or plain text. It is not a chapter. A title page, copyright line or dedication before the first Heading 1 is treated as front matter, not as an extra chapter.
- Check the Navigation Pane (View, then Navigation Pane). It lists every heading in order. If it reads like your table of contents, the import will too.
- Save as .docx. If the file is an older .doc, open it and use Save As to make a .docx first.
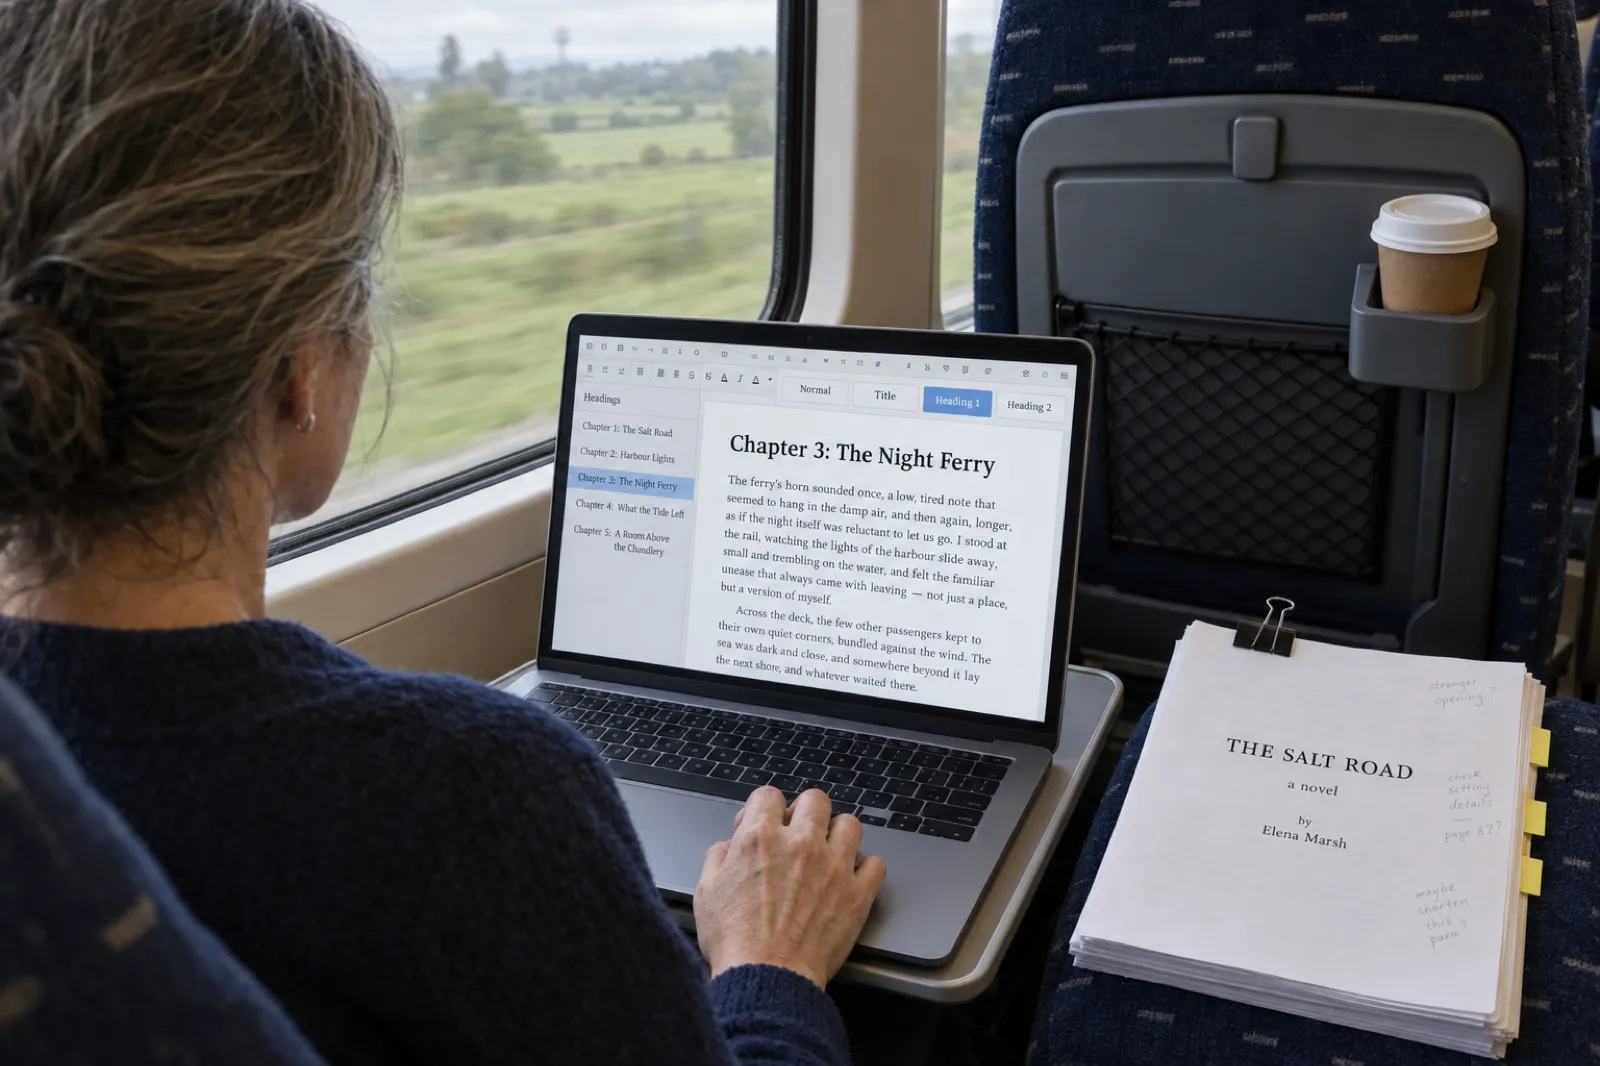
Two forgiving rules help with real manuscripts. If the file has no Heading 1 at all but does use Heading 2, Heading 2 becomes the chapter level. And if you started with Heading 1 but drifted into Heading 2 halfway through the book, any heading that reads "Chapter" followed by a number ("Chapter 12", "CHAPTER TWO", "Chapter IV: Descent") is still treated as a new chapter. A heading such as "Chapter Summary" is not, because it has no number.
Google Docs: same styles, then download as Word
Google Docs has the same styles in the toolbar menu that says "Normal text". Set chapter titles to Heading 1 and section titles to Heading 2, then choose File, Download, Microsoft Word (.docx), and import the downloaded file. The document outline on the left of Google Docs shows the same thing the Word Navigation Pane does. For a single chapter or some notes, you can also copy the text and paste it straight into a chapter in the editor; headings and lists come across (see pasting plain text).
PDF: no headings to read, so check the result
A PDF is a picture of pages. It has text in different sizes but no heading styles, so the import has to infer where chapters begin. Inkfluence AI reads the text in your browser, then a background step rejoins lines that the page layout broke, removes page furniture and finds the chapter starts. You see the progress ("Cleaning section 12 of 40") and, at the end, a choice of Open in Editor or Remix into a new book. It works well on most books, with one common slip: numbered section headings (1.1, 1.2, 2.1) can be promoted to chapters, so a 15-chapter book arrives with far more. If you still have the Word file the PDF was made from, import that instead. Covers inside a PDF are flattened images, so a PDF import starts with a fresh themed cover you can change. The PDF import help article has the short version.
EPUB, Markdown and plain text
An EPUB is already split into chapters, so its structure usually carries straight over, images included. In Markdown, a line starting with # is a chapter heading and ## a section. Plain text has no styles at all, so put each chapter title on its own line in a recognisable pattern: the import window lists the ones it looks for, such as "Chapter 1:", "Part I", "CHAPTER ONE", a title in capitals, "Prologue" or a *** break.
| File | How chapters are found | What to do first |
|---|---|---|
| Word (.docx) | Heading 1 styles; if there are none, AI reads the text for chapter titles | Heading 1 on every chapter title |
| Google Docs | Same as Word, once downloaded as .docx | Heading 1, then File, Download, .docx |
| Inferred from the text, since a PDF has no heading styles | Use the original Word file if you have it | |
| EPUB | The book's own chapter files | Usually nothing |
| Markdown (.md) | # headings | One # per chapter |
| Plain text (.txt) | Patterns such as "Chapter 1:" on their own line | Consistent chapter lines |
A long manuscript split across several files (Part 1, Part 2, Part 3) can come in as one book: select the files together. They are listed in filename order, so "Part 10" comes after "Part 2", and you can reorder or remove them before you click import. The Word and EPUB help article covers the multi-file details.
Step by step: what each screen shows
1. Open the import window
As James shows, there are two doors to the same window: New Book at the top right, then Import a document, or the Import content tile lower down the dashboard. You can also drag a file straight onto the prompt box on the dashboard. And if you paste more than about 5,000 characters into that prompt box, Inkfluence AI notices it looks like existing writing and offers Import as a book instead of treating it as an idea for a new one.
2. Drop your files here
The window says "Drop your files here", with the accepted types underneath: .docx, .doc, .txt, .md, .epub and .pdf. Drop the file or click to browse. Word and EPUB files are usually read in seconds; a long PDF takes longer and shows a progress bar while it works. Images inside a Word file or EPUB come across with the text.
3. Review the chapters
This is the screen to slow down on. The heading says how many chapters were detected in your book, and below it every chapter is listed by number and title, with its word count and an estimated page count (about 250 words a page). At the bottom are the total words and the number of chapters. Check three things: the first chapter is really your first chapter (not the title page or contents), the count matches your table of contents, and no chapter is suspiciously long, which usually means two chapters were joined.
For Word files the summary also lists what was tidied, such as page numbers and running headers removed or a title page moved to the front matter, with a See what changed link. When the word count checks out, it says Your words are unchanged. If the file had no headings the import could use, a note says the book was imported as a single chapter and explains how to mark chapters for next time.
4. Import, or Import and Remix
Three buttons sit at the bottom. Back returns to the upload so you can try a corrected file. Import (it shows the number, for example "Import 12 Chapters") brings the book in as it is and opens it in the editor; this is what most authors want, and it is what James does in the end. Import and Remix saves the book and then opens the remix window to write a new book from it, covered further down.
5. The genre is detected
A few seconds after the book opens, a note says which genre it detected, fiction in the video. This happens in the background from the first chapters. It matters later: the AI assistant in the editor uses the genre (and, for a novel, the character names it found) so its suggestions suit the kind of book you wrote.
6. The cover
An imported book starts with a themed cover so it never looks blank in your library. Click to edit it and choose from the stock images by searching for what you want to see, upload your own artwork, or create an AI cover from a short description on a paid plan or with credits. The cover design guide covers titles and thumbnails, and the AI book cover generator page shows the styles.
7. Edit, proofread or rewrite
The editor is where an imported book becomes yours to polish. Type straight into any chapter, or select a passage and choose a quick action: Proofread fixes spelling, grammar and punctuation while keeping your wording and voice; Rewrite makes a passage read better at roughly the same length; Shorten, Expand, Softer and Punchier do what they say. You see the suggestion first and choose Replace selection or Insert below, so nothing changes until you accept it. You can rename, reorder and delete chapters in the Chapters panel on the left. For a whole manuscript, the AI manuscript editor page walks through a full editing pass, and novelists can check continuity and dialogue with the AI novel editor.
8. Publish or export
Publish puts the book on the free Inkfluence AI showcase, a public page for the book, on any plan; on a paid plan it can also list the book in your own Gumroad account or Etsy shop, with the file and cover attached (the selling walkthrough video shows it). Export previews the book and downloads it as a PDF on every plan, or as an EPUB, a Word DOCX or a KDP package with any paid plan or credit pack. Which format goes where is its own short guide.
If the chapters split wrong
The chapter list on the Review screen is the moment to catch a bad split, because fixing the file and importing again takes a minute while fixing a saved book takes much longer. Match what you see to the cause:
- The whole book is one chapter. The file had no headings the import could use and the text had no clear chapter titles, so it kept everything together rather than guess. Click Back, set chapter titles to Heading 1 in Word, save and drop the file again.
- Far too many chapters. Section headings were taken for chapters. In Word, it usually means sections are Heading 1 too: change them to Heading 2. From a PDF, it usually means numbered sections; import the Word original if you have it.
- Too few chapters, with one very long one. A chapter title was typed in bold or large text instead of a heading style, so it was read as body text. Give it Heading 1.
- The first chapter is your title page or contents. A short title page, copyright page or contents page is normally moved to the front matter for you, and the Review screen says so. If one still shows as chapter one, it was styled Heading 1 and had enough text to look like a chapter: change it to the Title style or plain text.
- Chapters in the wrong order. With several files, the order follows the filenames. Use the arrows in the file list before importing, or number the files (01, 02, 03).
If you have already imported and only one or two chapters are off, fix them in the editor instead: rename or drag chapters in the Chapters panel, delete a stray one (deleted chapters go to a bin you can restore from), or add a chapter and move text across with cut and paste. The reorder and rename help article shows where each control is.
Import and Remix: one manuscript, a new kind of book
The video spends a moment on the second button because it does something no other import does: it treats your manuscript as source material. Your book is saved first, exactly as uploaded, and then the remix window writes a separate new book from its content. A novel can become a children's story; a business book can become a study guide, a workbook, a day challenge or a short lead magnet; a long guide can become a summary.
The formats are grouped as Popular (how-to guide, self-help, fiction, romance, business guide), Creative (including children's story, poetry and essay collection), Educational (study guide, lesson plan, email course, workbook, course companion), Content and Marketing (lead magnet, checklist pack, day challenge, Q&A book and more), Specialist (health guide, fitness plan, cookbook, travel guide and more) and Utility (summary). Pick one, then set the length: let the AI decide the number of chapters or set it yourself (3 to 40), and choose a chapter length of Default, Short, Standard or In-depth.
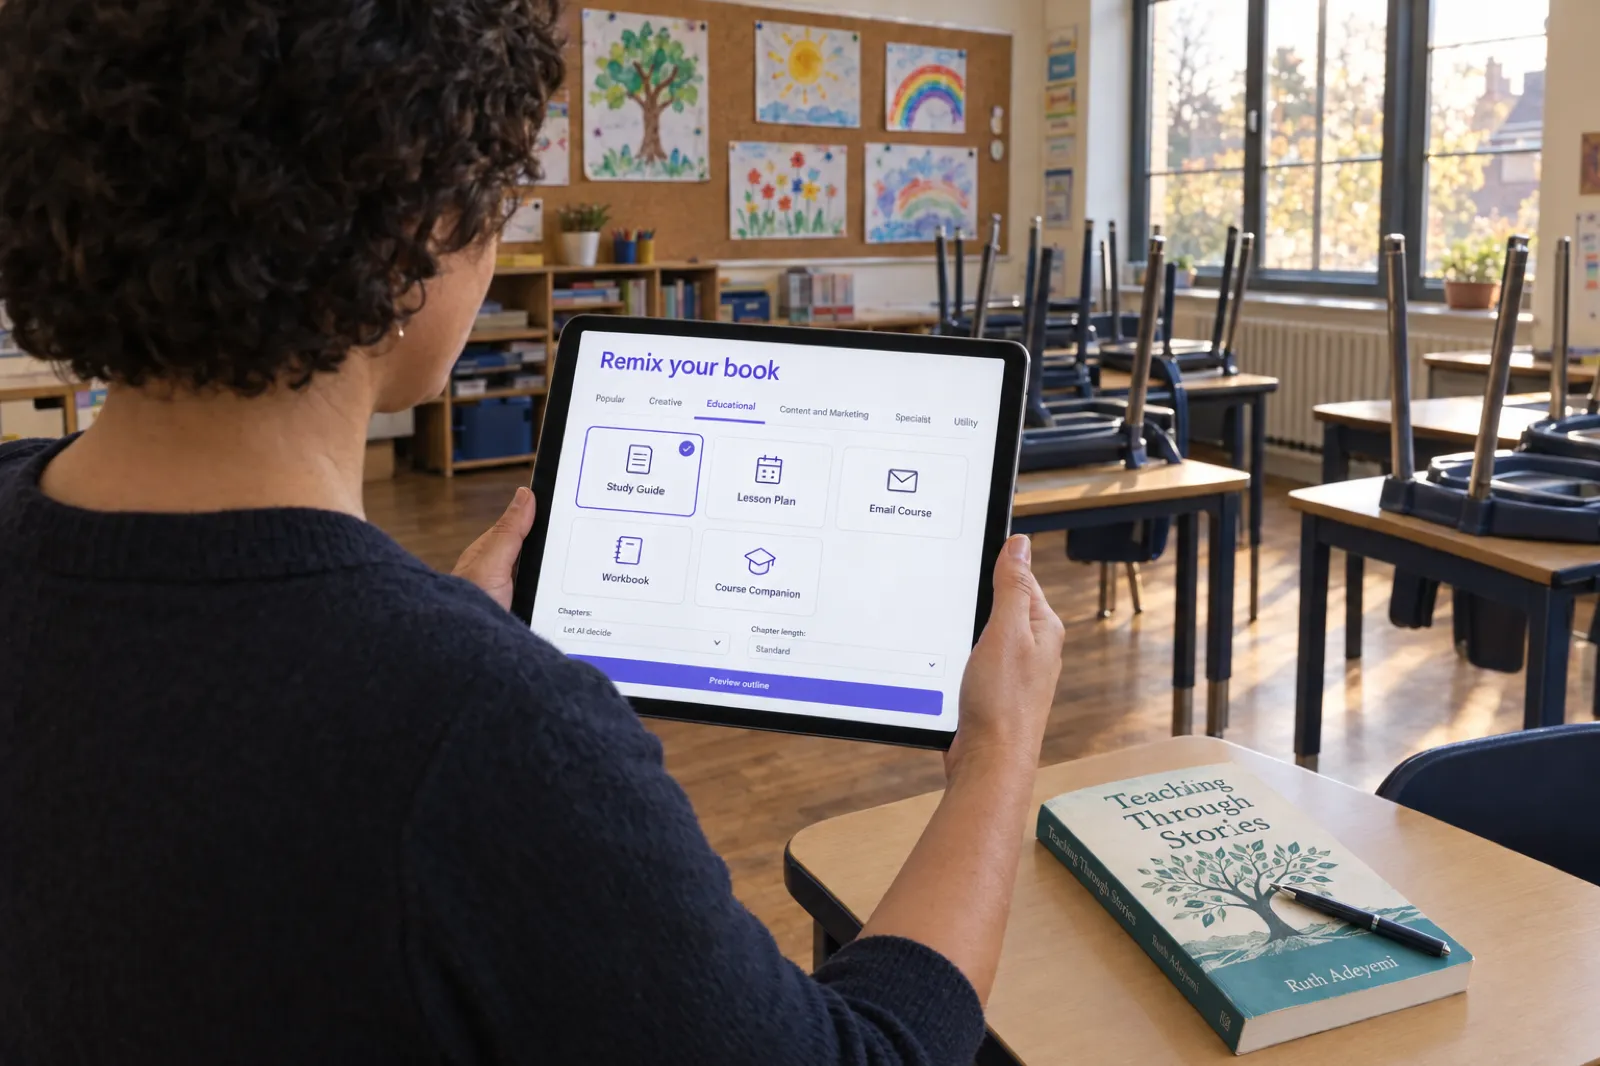
Then click Preview outline. As in the video, it builds the outline for you to review: the new book's title and every chapter with a summary. You can rename chapters, rewrite what each one covers, remove one or add your own, and nothing is written until you click Generate, which shows how many chapters it will write. Remixing writes new chapters, so it uses your monthly chapter allowance (five a month on the free plan, more on paid plans). Remix also translates a whole book into another language on a paid plan or with credits; the AI book translator page explains how.
Good uses: a study guide for a non-fiction book you teach from (study guide generator), a version of a story for younger readers (children's book creator), a workbook that sits alongside the main book, or a free sampler to collect email addresses (lead magnet guide).
Will AI change my writing?
Only where you ask it to. This is the question authors ask most before they upload, so it is worth being exact. The import itself generates nothing: your sentences come in as you wrote them. What it removes is material that is not part of the book, such as page numbers and running headers, and for Word files it lists those removals on the Review screen and confirms when the word count is unchanged. A PDF import goes further, because a PDF breaks lines at the edge of every page: it rejoins those lines, which is why it is worth reading a PDF import through once.
After that, every change is your choice. Proofread and Rewrite act only on the passage you select, and you see the suggestion before you replace anything. Import and Remix writes a new, separate book and leaves the original untouched. If you want a broader read of the whole manuscript (structure, pacing, what to cut), the AI developmental editor writes an editorial letter about the book rather than changing it.
From your manuscript to Amazon KDP
Many people import a manuscript for one reason: to turn it into files Amazon will accept without learning a layout program. After importing and editing, open Export.
- Kindle ebook: export an EPUB and upload it as your manuscript in KDP. The chapter headings you set become the table of contents.
- Paperback: export the KDP package, a zip with an interior PDF sized for print and a full wrap cover. Pick the trim size in Export first. The paperback guide covers trim, bleed and proofs, and the KDP export help article shows the steps.
- Disclosure: Amazon asks about AI-generated content when you publish. A book you wrote and only edited with AI is treated differently from one AI wrote; the KDP AI disclosure guide explains the difference. Check Amazon's current wording when you publish.
The full route, from account setup to pricing, is in self-publishing on Amazon KDP. If you would rather hear the book than read it, the same imported book can become an audiobook on a paid plan (ebook to audiobook).
What each plan can do with an imported book
| Step | Free plan | Paid plan or credits |
|---|---|---|
| Import a manuscript | Yes | Yes |
| Edit, proofread, rewrite | Yes, with a smaller daily allowance of AI actions | Yes, larger allowance |
| Import and Remix | Up to 5 new chapters a month | More chapters each month; credits add more |
| Export | PDF, EPUB, DOCX, KDP package | |
| Publish | Free showcase | Showcase, Gumroad, Etsy (paid plan) |
| AI cover | Stock images and your own upload | Also AI covers from a description |
The pricing page has the current plans and credit packs.
This video, or the other guides?
Full video transcript
Hi everyone, this is James from Inkfluence AI and today I'm going to be showing you how to upload your manuscripts into Inkfluence AI. So there's two ways that you can do this. You can select new book, import a document, or you can scroll down and click import content here. Now both options take you to the same screen here. So it's whichever one you prefer. So, if I click drop your files here and select my book and upload, it will then upload my manuscript into Inkfluence AI. Now, as you can see, it's highlighted the different chapters and chapter names and it's also summarized the total number of words and pages across that chapter. At the bottom here as well, it's also highlighted the total number of words and how many chapters there are.
Now, I can either import and remix, which is where it takes my book, and I can reformat my book into any of these options here. So, as you can see, it can be reformatted into a how-to guide, a children's story, a study guide, or a day challenge, just to select a few. You can select one of these options and then click preview outline and it will show you your book outlined in that selected option. So what Inkfluence AI is now doing is it's currently building the outline for me to review. So here I can see the chapters, the summaries of the chapters as well and if I'm happy then I can generate those chapters from there.
But what I'm going to do is I'm going to import the content. So selecting my book and I'm going to import the chapters straight into Inkfluence. So here as you can see it's detected the genre which is fiction and my book has now been imported into Inkfluence AI. From here I can edit the cover. So, I can choose from any of the stock images or use AI to create my cover. I can also edit the text and use Inkfluence AI to proofread or rewrite my content. When I'm ready, I can then publish my book as well, either onto Inkfluence AI's free showcase on Gumroad or on Etsy. Or I can export my book and download it as a PDF or any of these options and read it myself or upload it to Amazon. So that is how you upload your manuscript into Inkfluence AI.
Importing a manuscript: FAQ
Can I import a book I wrote in Word or Google Docs?+
Yes. Upload the Word file (.docx) from New Book, then Import a document, or from the Import content tile on the dashboard. For Google Docs, choose File, then Download, then Microsoft Word (.docx), and upload that file. Chapters split on Heading 1, so set every chapter title to Heading 1 in Word or Google Docs before you export, and section titles inside a chapter to Heading 2. You see every chapter, with its word count, before anything is saved.
Does the AI rewrite my book when I import it?+
No. Importing copies your text in as it is and generates nothing. The import removes things that are not part of the book, such as page numbers and running headers, and moves a title page to the front matter; for Word files it shows what it removed and says when your word count is unchanged. Your text only changes if you change it: by typing, by choosing Proofread or Rewrite on a passage you select, or by choosing Import and Remix, which writes a separate new book and leaves the original as you uploaded it.
Can I import a PDF?+
Yes, and several PDFs at once if a book is split across files. A PDF has no heading styles, only text in different sizes, so Inkfluence AI reads the text, rejoins broken lines and works out where the chapters start. That usually works, but numbered section headings can be taken for chapters, so check the chapter list afterwards. If you still have the Word file the PDF came from, import that instead: its heading styles make the split exact.
Can I import my manuscript and publish it on Amazon KDP?+
Yes. After importing, export an EPUB for a Kindle ebook, or the KDP package for a paperback: a zip with an interior PDF sized for print and a full wrap cover. Both come with any paid plan or credit pack. Upload them in your KDP account. If you used AI to edit a book you wrote, read Amazon's current AI content rules before you publish; KDP treats AI-assisted editing differently from AI-generated text.
Which file types can I upload?+
Word (.docx), PDF, EPUB, Markdown (.md) and plain text (.txt). The picker also accepts older .doc files, but saving them as .docx first is the safer route. You can drop several files of the same kind at once and they import as one book, in filename order, which you can change before importing. PDFs can be combined with other PDFs but not with Word, EPUB, Markdown or text files in the same import.
My whole book came in as one chapter. What now?+
The file had no chapter headings the import could use, so it kept everything together rather than guess. Click Back, set each chapter title to Heading 1 in Word, save, and drop the file in again. That is the quickest fix for a long book. For a short one, you can instead add chapters in the editor and move the text across yourself.
Is importing free?+
Yes. Any account can import a manuscript, edit it, publish it to the free showcase and export a PDF. Import and Remix writes new chapters, so it uses your monthly chapter allowance (five a month on the free plan). EPUB, DOCX and the KDP package, AI covers, and publishing to Gumroad or Etsy come with a paid plan; the export formats and AI covers also unlock with a credit pack.
What does Import and Remix do?+
It saves your manuscript as it is, then writes a new book built from its content in a format you choose: a how-to guide, a children's story, a study guide, a day challenge, a workbook, a summary and about 25 more. You set the number of chapters or let it decide, click Preview outline, and edit the chapter titles and summaries before anything is written. The original stays in your library unchanged.
Related tools
Related reading
- Ebook export and publishing: every format explained.
- Text to PDF conversion: when a plain PDF is all you need.
- How to write a book series with AI: book 2 from a book you already have.
- How Inkfluence AI keeps a book consistent: names, facts and timelines across chapters.
- How to write a book with AI: starting from an idea instead of a manuscript.
- Self-publishing guide: from finished book to sales.
Your book is written. Bring it in and finish it.
Mark your chapters with Heading 1, drop the file in, and check the chapter list before you import. Importing, editing and a PDF export are free.